Picture this: you're out of town, but you need to tweak your Raspberry Pi-powered home automation system. No problem! With SSH (Secure Shell), you can manage and control your Raspberry Pi projects from anywhere in the world. Whether you're a tech enthusiast or a professional developer, SSH offers a secure and efficient way to connect to your IoT devices remotely. As the world of IoT continues to expand, learning how to set up SSH on your Raspberry Pi is more important than ever.
Connecting to your Raspberry Pi via SSH from an Android device isn’t just a tech buzzword—it’s a game-changer. This guide will walk you through the process of setting up SSH on your Raspberry Pi and teach you how to access it remotely using your Android device. By the end, you'll be able to effortlessly control your IoT projects no matter where you are.
Ready to take control of your Raspberry Pi from anywhere? Let’s dive deep into the details and explore how SSH can revolutionize the way you interact with your IoT projects. Buckle up, because we’re about to unlock the full potential of your Raspberry Pi.
Read also:Simon Cowell The Man The Myth The Legend
Table of Contents
- Getting Started with SSH Raspberry Pi IoT
- What Exactly is a Raspberry Pi?
- Demystifying SSH Basics
- Merging Raspberry Pi with IoT
- Setting Up SSH on Your Raspberry Pi
- Accessing Your Raspberry Pi Remotely
- Top Android Apps for SSH
- Fortifying Your SSH Security
- Troubleshooting Common SSH Issues
- Wrapping It Up
Getting Started with SSH Raspberry Pi IoT
SSH Raspberry Pi IoT isn’t just a technical phrase—it’s your ticket to managing your Raspberry Pi-based IoT projects from anywhere. The Secure Shell protocol creates a secure, encrypted connection between your device and your Raspberry Pi, ensuring that your data stays safe during transmission. This is especially important when you’re dealing with sensitive IoT applications.
Why SSH? The Case for Secure Remote Access
SSH offers a host of advantages over other remote access methods, making it a go-to choice for tech-savvy users:
- Encryption: SSH ensures that all communication between your device and the Raspberry Pi is encrypted, protecting it from prying eyes.
- Convenience: Setting up SSH is straightforward, and once it’s done, you’ll have seamless access to your Raspberry Pi.
- Compatibility: SSH works across various operating systems and devices, making it versatile for different setups.
- Efficiency: With its command-line interface, SSH allows you to manage your IoT projects efficiently, saving you time and effort.
What Exactly is a Raspberry Pi?
The Raspberry Pi is a tiny yet powerful computer developed by the Raspberry Pi Foundation. Despite its small size, it’s packed with features that make it a favorite among hobbyists, educators, and professionals alike. It’s commonly used for a wide range of projects, from teaching kids how to code to building complex IoT systems.
Key Features That Make Raspberry Pi Stand Out
Here are some of the standout features that make the Raspberry Pi a must-have for IoT enthusiasts:
- Compact Design: Its small form factor and low power consumption make it ideal for portable and embedded applications.
- Operating System Flexibility: The Raspberry Pi supports a variety of operating systems, including Raspbian, Ubuntu, and more.
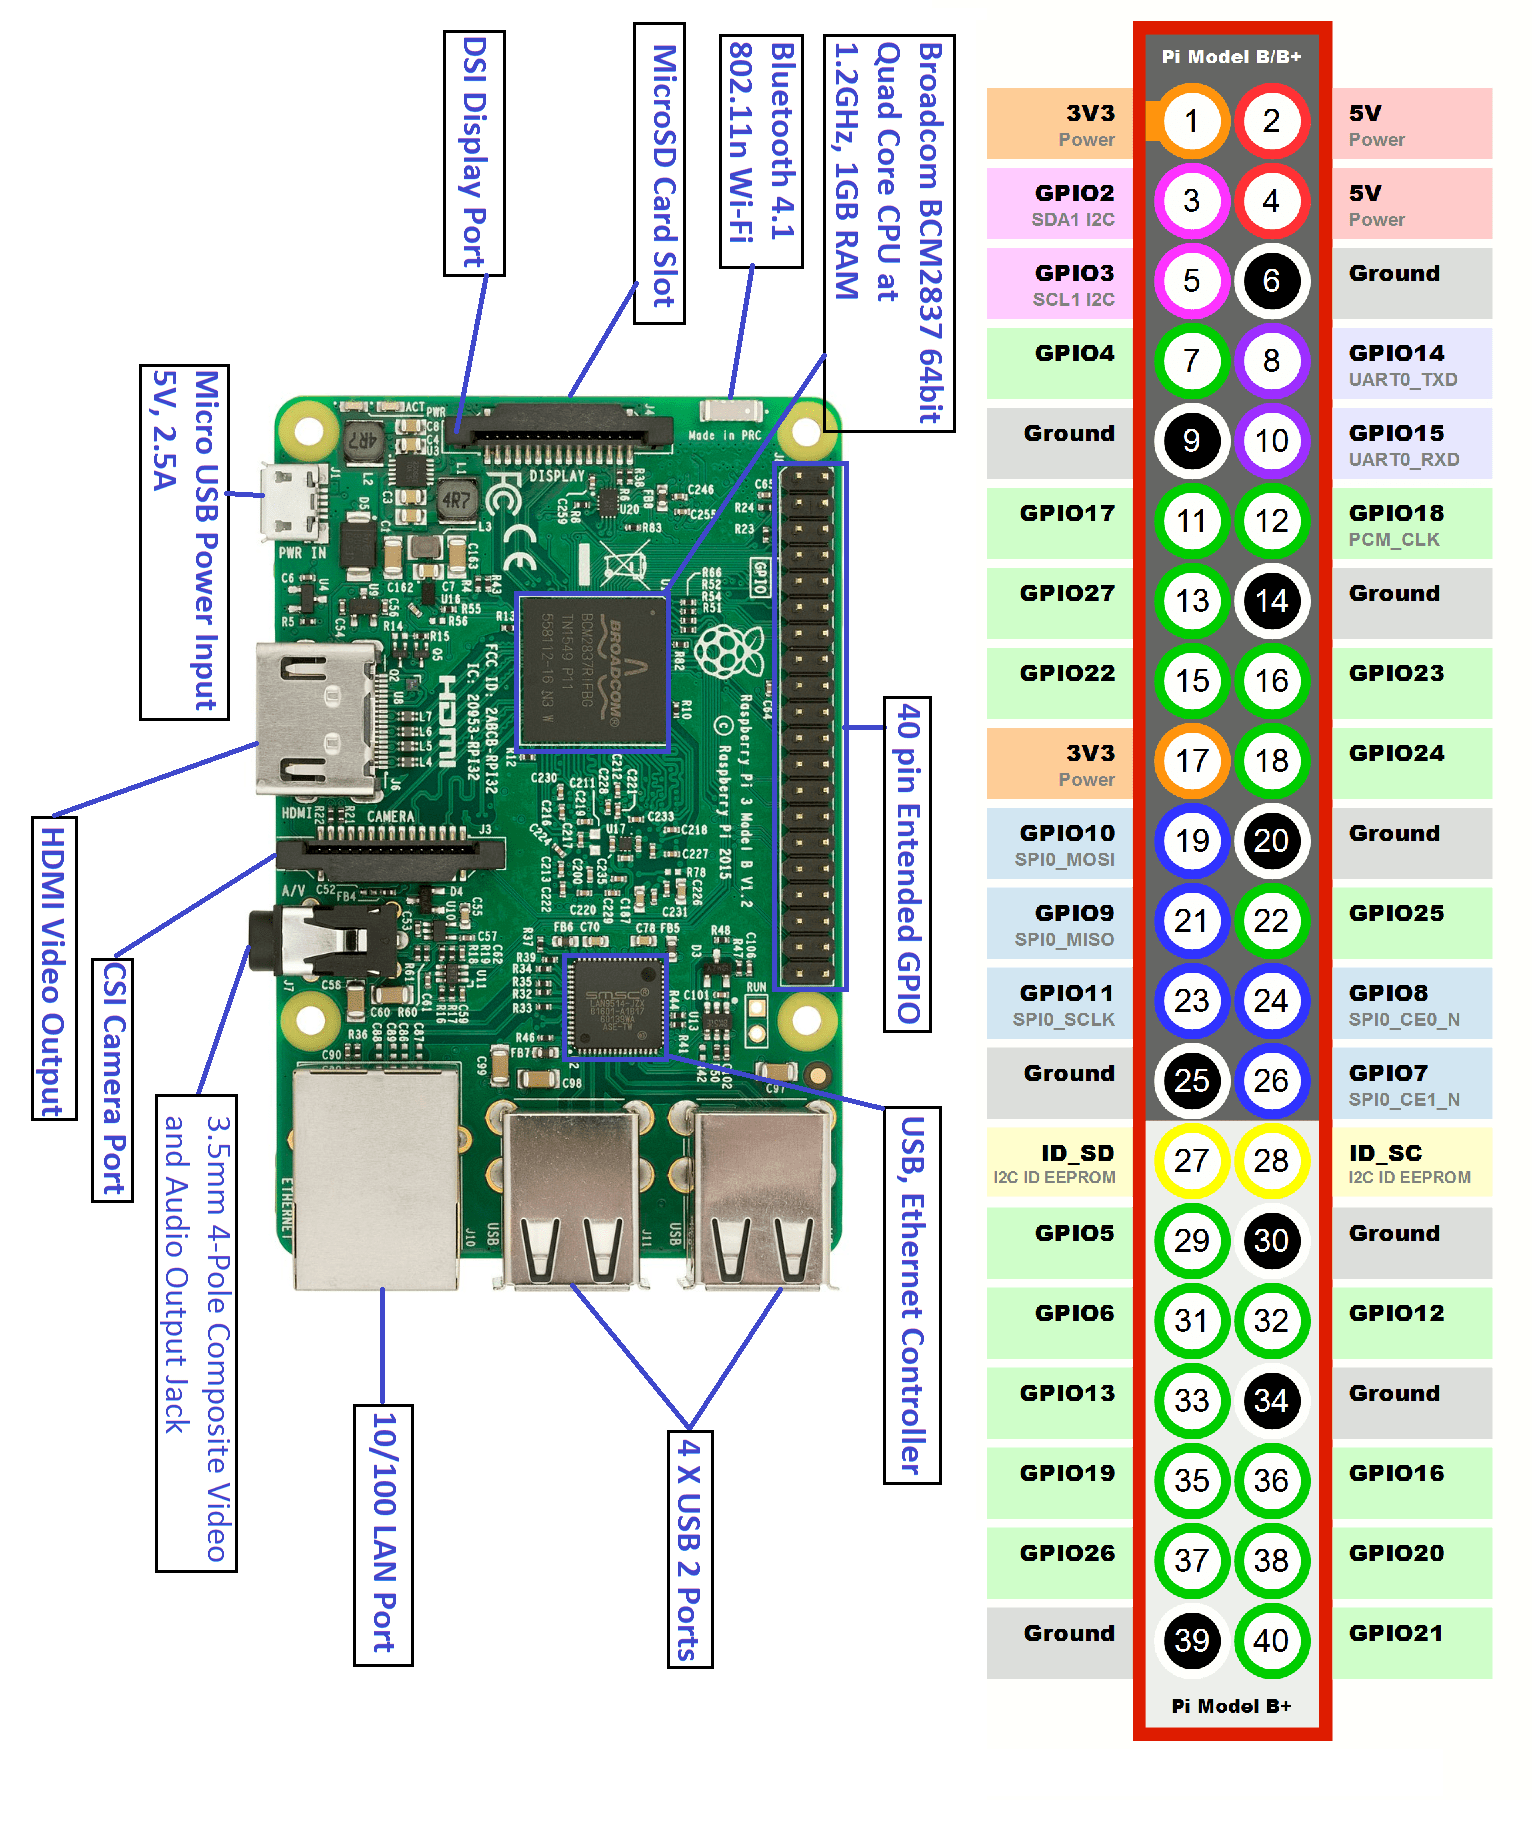
- GPIO Pins: These pins allow you to connect sensors, actuators, and other hardware components directly to the board.
- Expandability: With compatibility for a wide range of accessories and expansion boards, the Raspberry Pi can be customized to meet almost any need.
Demystifying SSH Basics
SSH, or Secure Shell, is a cryptographic network protocol that enables secure communication between two devices. It creates a secure channel over an otherwise unsecured network, allowing you to access remote servers or devices without worrying about data breaches.
How SSH Works: A Closer Look
When you use SSH, the protocol establishes an encrypted connection between your client device (like your Android phone or laptop) and the server (your Raspberry Pi). This encryption ensures that any data exchanged between the two devices remains confidential and protected from unauthorized access. Essentially, SSH acts as a digital bodyguard for your data, keeping it safe during transit.
Read also:Heavens Official Blessing Season 3 A Mustwatch Adventure In The Celestial Realm
Merging Raspberry Pi with IoT
Integrating your Raspberry Pi with IoT opens up a world of possibilities. By connecting sensors, actuators, and other devices to your Raspberry Pi, you can monitor and control your IoT projects remotely. Whether you’re automating your home or building a weather station, SSH makes it easy to manage everything from afar.
Steps to Integrate Raspberry Pi with IoT
Here’s how you can get started with integrating your Raspberry Pi into the IoT ecosystem:
- Install Necessary Software: Begin by installing the required libraries and software on your Raspberry Pi to support your IoT project.
- Connect Hardware: Use the GPIO pins to connect sensors, actuators, and other hardware components to your Raspberry Pi.
- Write Scripts: Develop scripts or programs to handle data collection, processing, and communication with the connected devices.
- Set Up SSH: Finally, configure SSH on your Raspberry Pi to allow for remote management and control of your IoT setup.
Setting Up SSH on Your Raspberry Pi
Configuring SSH on your Raspberry Pi is a simple process that involves enabling the SSH service and tweaking its settings for optimal performance. Let’s break it down step by step:
Enabling SSH on Raspberry Pi
Follow these easy steps to enable SSH on your Raspberry Pi:
- Power on your Raspberry Pi and log into the operating system.
- Open the terminal and enter the following command:
sudo raspi-config. - Navigate to "Interfacing Options" and select "SSH".
- Choose "Enable" and reboot your Raspberry Pi to apply the changes.
Accessing Your Raspberry Pi Remotely
Once SSH is up and running on your Raspberry Pi, you can access it remotely from any device connected to the internet. Here’s how you can connect to your Raspberry Pi from a local network:
Connecting via SSH on a Local Network
First, you’ll need to find the IP address of your Raspberry Pi. Use the following command in the terminal:
hostname -IOnce you have the IP address, open a terminal on your computer and type:
ssh pi@This will establish a secure connection to your Raspberry Pi, allowing you to manage it remotely.
Top Android Apps for SSH
If you’re using an Android device, there are several great apps available that make connecting to your Raspberry Pi via SSH a breeze. Here are two of the best options:
1. JuiceSSH: Your Go-To SSH Client
JuiceSSH is a highly regarded SSH client for Android. It offers a user-friendly interface, robust features, and support for multiple connections. You can manage SSH keys, customize themes, and even use it for scripting—all from the palm of your hand.
2. Termius: Seamless Remote Access
Termius is another top-tier SSH client that provides a smooth experience for managing remote servers and devices. With features like session management, clipboard support, and customizable keyboard options, Termius makes it easy to control your Raspberry Pi from your Android device.
Fortifying Your SSH Security
Security should always be a top priority when it comes to remote access. Here are some best practices to ensure your SSH setup is as secure as possible:
- Strong Authentication: Use strong passwords or SSH keys to authenticate your connections.
- Disable Passwords: Disable password-based authentication entirely and rely solely on SSH keys for added security.
- Change Default Port: Switch the default SSH port (22) to a non-standard port to deter automated attacks.
- Firewall Protection: Configure a firewall to restrict access to specific IP addresses, further safeguarding your Raspberry Pi.
Troubleshooting Common SSH Issues
Even with the best setup, issues can arise. Here’s how to troubleshoot some common SSH problems:
Problem: Can’t Connect to Raspberry Pi
If you’re having trouble connecting to your Raspberry Pi, here’s what you should check:
- SSH Enabled: Confirm that SSH is enabled on your Raspberry Pi.
- Correct IP Address: Double-check that you’re using the correct IP address for your Raspberry Pi.
- Network Settings: Verify your network settings and ensure there are no firewall restrictions blocking your connection.
Wrapping It Up
SSH Raspberry Pi IoT from anywhere download Android is more than just a technical capability—it’s a powerful tool that empowers you to manage your IoT projects remotely. By following the steps outlined in this guide, you can set up SSH on your Raspberry Pi, secure your connections, and take control of your IoT projects from anywhere in the world.
We encourage you to dive deeper into the world of IoT and explore the endless possibilities your Raspberry Pi has to offer. Share your experiences and insights in the comments section below, and don’t forget to visit our website regularly for more resources and tutorials on Raspberry Pi and IoT.
References: